Learn step-by-step how to start your blog, write your first post and begin to promote yourself online.
We’ve used our years of experience in growing successful blogging brands in the UK to bring you the exact system we use to set up our new blogs.
Building a great foundation for your blog is key to letting you focus on the stuff that really matters, content!
Let’s take a look at the simple steps you need to take to start publishing your writing online and gaining an audience.
Choosing a niche for your blog
Choosing a niche for your blog is the most important step when you’re starting your blog. It’s also one of the hardest steps to get right. Before you decide on a niche, there are some questions you should ask yourself:
- Who is my audience?
- What do I want to accomplish with this site?
- What topics am I passionate about?
- Are these topics under-served by other sites on the internet?
- If so, what would make them stand out from those already out there covering similar ground?
Ideally, you want your first blog to have a defined audience you can write for, this could be based on age, demographic, passion, diet, health or any other differentiating factor that means they’ll gain value from your content.
What’s your long-term goal? If you want to monetize your blog in the future it’s worth considering if there are any products or services you can affiliate further down the line.
Do you have at least a general understanding and interest in your niche? Blogging requires lots of hard work. You’ll be writing articles and posts ranging from 500 to 2000 words + so being passionate about the subject matter can be a real help when you’re going through a bit of a writing block.
Are other websites covering the same subject matter? While this isn’t a red flag it does mean you’ve got some competition. If you can find an underserved topic it’s much easier to start getting traffic from search engines and building your visibility online.
If you do have other websites talking about your topic or niche is there a different angle you can use? If lots of the sites you find review products, consider creating helpful how-to and informational guides that may not generate as much affiliate income but really help your audience and build trust around your blog.
Choosing a domain
Now that you’ve decided to start blogging, the next step is to choose your domain name. Your domain name is like your physical address but on the internet.
Choosing a good domain name can be tricky, lots of domain names have already been purchased and you might need to get creative to find a suitable domain that matches your blog’s goals.
As a blogger in the US or the UK, you’ll want to try and find a domain with either a .com or .co.uk TLD (Top Level Domain). This helps identify the audience you’d like to reach and most specifically the language you’ll be serving your content in.
If you’re creating a blog for an audience in another country in their native language then I strongly recommend using the appropriate TLD to help search engines quickly ascertain who your blog is for.
Here are some simple rules to follow to find a memorable domain name:
- Make it easy to remember
- Try to keep it as short as possible (ideally below 12 characters)
- Make sure to include your brand name or something related to your niche
Buying a domain
To buy your domain you’ll need to use something called a domain registrar. We recommend Crazy Domains which has a great customer support system and affordable pricing on both .co.uk and .com domains.
Simply create an account and use the search function in the top right of the website to see if your domain is available. As soon as you’ve settled on an appropriate name you can hit add to basket and head through the checkout process.
We’ll be heading back over here later after we’ve set up our hosting.
*Pro tip – Registars will normally try to add lots of unnecessary extras to your basket during checkouts like a directory listing or SEO package. These aren’t required and provide little value for most users.
Setting up hosting
Web hosting is the service that allows you to store your website on a server. This means that your website will be available 24/7, even if you’re not.
There are a few different kinds of web hosting: shared hosting, VPS (virtual private server) hosting, and dedicated hosting. Each has its own advantages and disadvantages but we’ll keep it simple.
We recommend going with a high-quality host like Cloudways right from the start. It only costs £10/month for its basic package and its simple UX and responsive support team make it an easy choice for new bloggers that don’t have the technical skills required to set up and optimise their own server.
Go through their simple sign-up process, select their most affordable package (usually with Digital Ocean Data Centres) and hey presto, you’ve got your own server ready to start hosting your new blog.
Creating an application
On Cloudways you can have a number of applications on a server. Each application is a website with its own settings.
Follow this awesome guide from the guys at Cloudways to help launch your first application on your brand-new server.
Installing WordPress
Thanks to Cloudway’s awesome interface installing WordPress on your application is as quick as the click of a few buttons.
You’ll be able to select from installing the latest version of WordPress or if you’re considering using your blog for e-commerce in the future you may want to consider installing WordPress + WooCommerce.
What’s WooCommerce – WooCommerce is a free WordPress plugin that allows you to sell anything online. It’s the most popular e-commerce platform in the world, and it powers more than 3 million websites.
Pointing your domain at your hosting
This is probably the most technical step of your entire blogging journey, but don’t worry, we’ll make it as simple as possible so you can get on with the fun stuff like picking templates and starting to write.
Log back into your Crazy Domains account (or any other registrar you’ve opted to use).
Once you’ve logged into your account navigate to the domains section and select the domain you purchased earlier.
Scroll down until your reach your DNS settings, if you’re using Crazy Domains it will look like this:
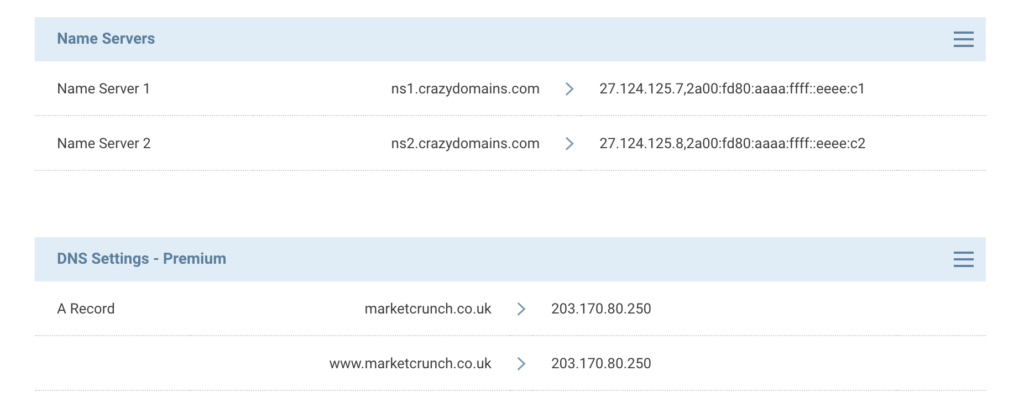
Hover over the A Record row at the far right until a ‘modify’ prompt appears that allows you to start editing your A Record, it should look like this:
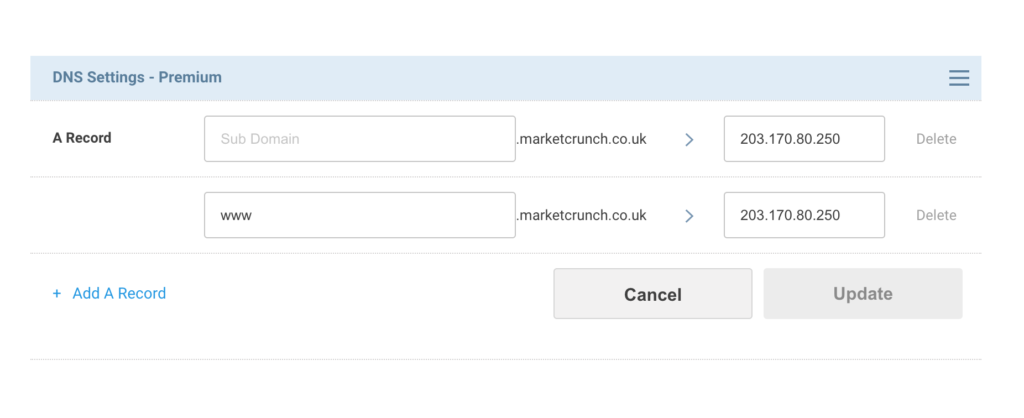
Last but not least, head back over to your Cloudways application, in the Access Details section you’ll see your Application Credentials. Simply copy your Public IP, head back over to your registrar and paste it into both A Records to replace the existing IP address.
That’s it, your done, you’ll only need to come back here if you want to change your hosting or set up additional services like an email for your domain.
Head over to Cloudways, copy your Admin Panel URL, paste it into your browser and hit enter. You should be met with a WordPress login page that looks like this (if you’ve just pointed your domain at your application it can take 24 hours for changes to take effect so don’t panic if you get a server response error initially):
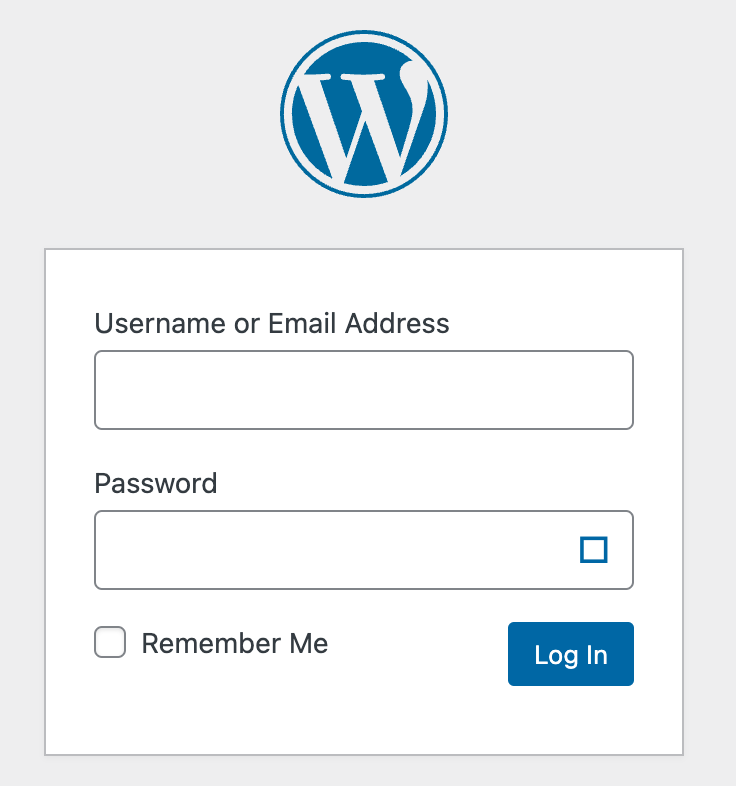
Using the password and username provided by Cloudways you can now log in to your new WordPress website to begin editing your site and creating your blog.
Setting up WordPress
Now you’re in your WordPress admin dashboard there are a few things we need to do to make sure your blog is perfect right from the start.
Modifying your WordPress settings
First of all head down to the settings tab on the right-hand side of your dashboard. When you hover over the settings tab you’ll be met with several options but we’re only concerned with General and Permalinks at this stage.
General – In the general settings, you can add your website name, tagline and administration email address (where you want any emails related to your site to be sent).
Permalinks – In the permalinks settings you’re going to want to check the box titled ‘Post name’. This ensures that all of the pages you create have a short digestible URL, just like the one on this page.
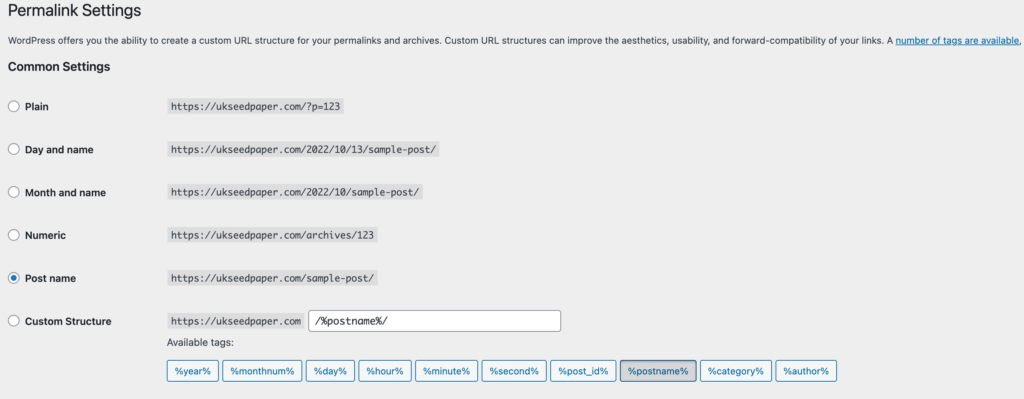
Once you’re all done click save changes and we can move on to editing the look and design of your site.
Picking a theme
A WordPress theme is a file that contains all of the formatting and styling information for your website including colours, fonts, and layout. It’s what dictates the look and feel of your site.
There are lots of great free themes available that give you a wide range of options. We recommend using the Astra theme (and its repository of pre-built website templates) because it’s clean, fast, regularly updated and easy to customize.
Let’s look at how you can turn your basic WordPress install into a professionally designed website with a few simple steps.
Installing your theme
In your dashboard, hover over the Appearance tab and click Themes. All websites come with the classic 2022 theme pre-installed but we’re going to want to replace this with Astra to give us all of the design functionality we need to help you start your blog with a great UX (user experience) right out of the gates.
Hit the Add New button at the top of the page to head over to the WordPress theme depository. Using the search bar, find Astra, hover your mouse over the image and click Install.
Once your theme has been installed you can click Activate to deploy it onto your live website.
Installing Starter Templates
Now we’ve got our theme set up we need to decide how our website should look and which pages we need to include.
To do this we’ll be using an awesome plugin from the creators of the Astra Theme called Starter Templates. It’s a repository of hundreds of professionally designed website templates you can use for your blog with the click of a few buttons.
To install Starter Templates we’re going to head over to the Plugins option on your dashboard and click Add New. Search Starter Templates (it’s created by Brainstorm Force) and activate.
Now head over to your Appearance tab and click the new Starter Templates option. This will begin the set-up wizard that will guide you through selecting your template, adding your logo and customising colours and font sets.
Try to pick a template that fits with your niche and topic to reduce any design work you’ll need to do to brand your site.
The video below guides you through the whole process from start to finish. If you’re just starting out we recommend using the Elementor page builder which offers the most user-friendly solution to editing how your website looks and has a vast range of helpful tutorials available online.
Creating your core pages
When you’re first thinking about how to start your blog it’s easy to get carried away looking at websites that have whole teams behind them focusing on UX and design.
At this early stage, we want to focus on creating the core pages that are necessary to run a successful website.
Home – The hub of all your website’s activities, your home page should make it abundantly clear what your website offers and who it’s for.
Blog – Where all your amazing new content will live. The blog is where any of the posts you create will appear with the most recent sitting at the top of the page.
About – Your about page is your time to tell your future readers why you’re the best person for the job. What makes your opinion valuable, what led you to start this blog and what are your goals for the site moving forward?
Contact – Your contact page doesn’t need to be complex but it does need to offer some method of contact in the form of an email address or a contact form. The internet is all about trust and a combination of a clear about page and an easy method of contact shows your users and Google that you’re a trustworthy source.
If your template comes with lots of pages you can simply delete any additional pages.
*Pro Tip – Try to keep it simple, we don’t want to be spending hours and hours on design, content means traffic and the sooner you can start writing the better.
Finishing your WordPress set-up
Finally, we need to head back over to the WordPress general settings to make a few final changes.
Head back to the reading setting and make sure to do the following:
- Check the box that states Your Home Page Displays to A static page
- Using the dropdown select your Home as your Homepage
- Now select your Blog page as your Posts page.
- Finally, make sure the ‘Discourage search engines from indexing this site’ checkbox is not ticked. and click Save Changes.
Writing your first blog post
You’ve turned your great idea for a blog into a killer website and you’ve made it to the home stretch, now it’s time to make start populating your blog.
First things first: Don’t try to write a perfect first blog post. It’s tempting to want everything to be perfect from the start, but you don’t need an amazing piece of content from the outset.
Instead, focus on creating content that helps and engages your readership, even though this is your blog you should be writing for the user. Think helpful content, how-to’s, detailed guides and comparisons, avoid writing posts about yourself if it doesn’t help your readers.
Try to use Grammarly (or another online grammar checker) when writing to avoid any mistakes in grammar or spelling. Why? Because if you come across as unintelligent because you don’t know how to spell basic words like “their” or “there,” they’re not going to trust any of your other advice either.
Aim to create posts that exceed 1000 words, as a general rule longer articles tend to perform better in search engines like Google and can kickstart a flow of organic traffic after just a few months of your new blog going live.
Adding post categories
Categories allow you to organise your posts into groups based on the subject matter. For example, if your blog is about digital marketing then your first four categories could be:
- SEO
- Paid Search
- Content Marketing
- Social Media Marketing
Don’t start creating categories until you have an appropriate blog post, this ensures you don’t create any empty pages on your website that add no value to the user or to search engines.
As your website grows you can start to add more categories and even create sub-categories to really deep dive into specific topics.
Creating a content strategy
Now your blog is making progress and you’re starting to add posts on a regular basis it’s time to consider a content strategy.
A content strategy is a plan for how you will create and share your content. A good way to think about this is like building a house you need a solid foundation before you can build anything on top of it.
Two of our favourite content strategies that have worked well for other blogs include:
- Keyword-focused: This strategy focuses on what people search for when they’re looking for specific search terms related to your niche and blog. You can use this to develop your SEO strategy so that people who are searching for what you’re writing about can find you easily on search platforms.
- Problem-focused: This strategy focuses on identifying problems that people have and solving those problems by offering advice and/or a solution. For example, creating a piece of content like this ‘how to start your blog’ is clearly here to help and guide people through how to start their own blog, backed with real-life experience that can add value to their journey.
Other content strategies may focus on the velocity of content with goals like publishing x amount of articles a week or some other similar time-based goals.
Find out more about the benefits of content marketing for your blog here.
Promoting your blog online
Once you’ve created your blog and have a steady stream of quality content flowing in, it’s time to promote your blog online. There are several ways you can do this, including social media, search engine optimization (SEO), email marketing and content marketing.
Social Media
One of the easiest ways to start promoting your blog content online is by setting up dedicated social media accounts for your blog.
Some of the most popular social media sites include:
- Snapchat
- YouTube
This is a fantastic way to build an engaged audience that you can direct to the content on your blog. Each social media platform has its own unique systems and some of them favour niches that can create visually appealing images and videos for their audiences (Pinterest, Instagram) while others focus more on professionals and sharing content related to your work life and job role (LinkedIn).
SEO
SEO stands for Search Engine Optimisation. It’s the process of optimising your website so that it ranks higher in search results (mainly Google’s search results).
SEO is a huge topic and making sure you understand the basic principles will really help increase the readership of your new blog.
The core takeaway here is keywords (the terms people type into Google’s search bar to find what they’re looking for). Any post you create should have a keyword in mind that it’s trying to target.
Let’s look at a real-life example to make things easier:
If you’re writing an article all about the different ways to promote your blog online you need to think about how people would search to try and find the information you’re creating and this all start with the title of your post.
So based on what we know and how people search online which would be the better title:
A) How I used a carefully planned strategy to build website traffic to my new blog
B) How to promote your blog and increase traffic to your website
Both of these titles work but option B) will work vastly better for anyone trying to find your blog on search pages.
Try to put yourself in the shoes of someone searching for your topic. What would you type into Google? Chances are whatever you come up with is probably going to need to appear somewhere in your title.
Outside of adding the keyword to your title, you should also add it to:
- The URL
- The start of your content
- Throughout the body of your article
- At the end of the article
Just by following this simple principle, you’ll already be well on the way to page one of Google search results.
Email Marketing
Services like Send In Blue and Mail Chimp have made email marketing not only affordable (and sometimes free) but incredibly easy to use.
You can start by adding a subscriber form to your website which collects the email addresses of your visitors and pipes them directly into your email marketing software.
You can use email marketing to highlight your recent posts and share important news. As you start to develop your audience you can even begin generating revenue with your emails by affiliating products, courses and services related to your blog’s niche.
Blogging takes time, be patient
Last but not least it’s really important to understand that blogging doesn’t produce quick results, as a new website it can take 6 months before you even start to see some traffic.
With this in mind, it’s really important to keep your expectations realistic and not to get disheartened when all your hard work doesn’t yield immediate returns.
Most blogs will start to really thrive 12-18 months after they’ve been created provided you’re regularly adding helpful, user-focused content.
Conclusion
If you’re looking at how to start your blog hopefully this detailed guide has given you all the tips and advice you need to succeed.
The most important thing when it comes to blogging is taking action. Part of that was simply reading this guide but now you need to act on what you’ve learnt.
Even if you break it down into small accessible chunks like buying hosting, purchasing a domain or just hitting publish, the act of doing is the main thing that will lead to your blog’s success.
So get that blog live and start publishing great content, you’ll be amazed at how life-changing it can be to own and operate a thriving blog that influences tens of thousands of people every single month.


